Simple Maintenance Habits for Your Electric Chicken Plucker
Simple habits keep your electric chicken plucker working at its best for years. With regular care, you prevent breakdowns and save money. You do not need special skills to protect your Kitchener Chicken Plucker. Clean it after use and check for worn parts. These actions make long-term care easy. Use these tips to help your electric chicken plucker last longer and work better every time.
Key Takeaways
-
Clean your electric chicken plucker after each use. This removes feathers and dirt. It stops buildup and bacteria from growing.
-
Check rubber fingers, bolts, and belts often. Look for damage early. This helps keep the machine safe.
-
Oil moving parts every week with food-safe oils. This lowers wear and keeps it working well.
-
Keep your plucker in a dry, covered spot. Dry it fully after cleaning. This stops rust from forming.
-
Do not put too much in the drum. Follow the user manual. This protects your machine and helps it last longer.
Why Maintenance Matters
Protect Your Investment
You want your electric chicken plucker to last a long time. Taking care of it helps keep it working well. Cleaning your chicken plucker machine after each use stops feathers and dirt from piling up. This habit helps the machine run smoothly and look nice. If you put your machine in a dry, safe spot, you stop rust and damage. These steps help your machine keep its value for years. If you want to sell your chicken plucker machine, a clean one will get more buyers and a higher price.
Tip: A clean and cared-for electric chicken plucker works better and lasts longer than one that is not cleaned.
-
Cleaning after each use keeps the machine free from buildup.
-
Checking for loose bolts and screws keeps the machine strong.
-
Storing in a dry area stops rust and damage.
Prevent Repairs
You can stop many expensive repairs by doing regular maintenance. When you check your electric chicken plucker often, you find broken or worn parts early. You can change these parts before they cause bigger problems. Tightening bolts and screws keeps everything together and stops breakdowns. These habits help your chicken plucker machine work well and stay safe. You save money and time because you do not have to fix big problems later.
Regular maintenance also helps your machine work well for a long time. Your machine will work better and be more reliable when you take care of it. You get more use from your investment and enjoy easier plucking every time.
Cleaning Tips
After Each Use
You should clean your chicken plucker every time you finish using it. This habit keeps your machine working well and helps it last longer. If you leave feathers or dirt on the machine, bacteria can grow. You do not want this to happen. Cleaning after each use also lets you spot any worn or broken parts early.
Here are some cleaning tips to follow after each use:
-
Remove all feathers from the drum and rubber fingers.
-
Rinse the drum and fingers with warm water right away.
-
Use a bristle brush to scrub away any stuck dirt or debris.
-
Check under the rubber fingers for hidden buildup.
-
Let all parts dry before storing the machine.
Tip: Cleaning your chicken plucker after every use is the best way to keep it safe and efficient. Manufacturers recommend this routine to help your machine last longer and work better.
Safe Cleaning Methods
You need to use safe methods when you clean your chicken plucker. Harsh chemicals can damage the rubber fingers and other parts. Bleach and strong cleaners may make the rubber crack or wear out faster. Instead, choose food-safe cleaners that protect your machine and keep it safe for food use.
Follow these steps for safe cleaning:
-
Unplug the machine before you start cleaning.
-
Mix warm water with a small amount of dish soap or food-safe cleaners.
-
Use a soft bristle brush to scrub the drum, rubber fingers, and all surfaces.
-
Pay special attention to the area under the rubber fingers. Dirt can hide there.
-
Rinse all parts with clean water to remove soap and debris.
-
Dry the machine with a clean towel or let it air dry in a safe place.
Note: Never use bleach or harsh chemicals. Food-safe cleaners keep your chicken plucker in good shape and safe for your next use.
You should always clean your chicken plucker with care. This routine helps you avoid damage and keeps your machine ready for the next job. If you follow these cleaning tips, you will notice your machine works better and lasts longer. Clean your chicken plucker after every use, use food-safe cleaners, and check all parts for hidden dirt. These steps make cleaning easy and help you get the best results from your machine.
Inspect Parts

Regular inspection keeps your electric chicken plucker running safely and efficiently. You should make safety checks a habit. These checks help you spot problems early and prevent bigger issues later. Use the table below to guide your inspection routine:
|
Part |
Inspection Frequency |
Action Needed |
|---|---|---|
|
Rubber Fingers |
After each use |
Check for cracks, splits, or missing pieces; replace if needed |
|
Bolts/Screws |
Weekly |
Check tightness; tighten or replace if loose |
|
Belts |
Weekly |
Inspect for wear or slipping; fix or replace if needed |
Tip: Cleaning your machine after every use helps you notice worn parts early. Deep cleaning and inspection once a year keeps your machine in top shape.
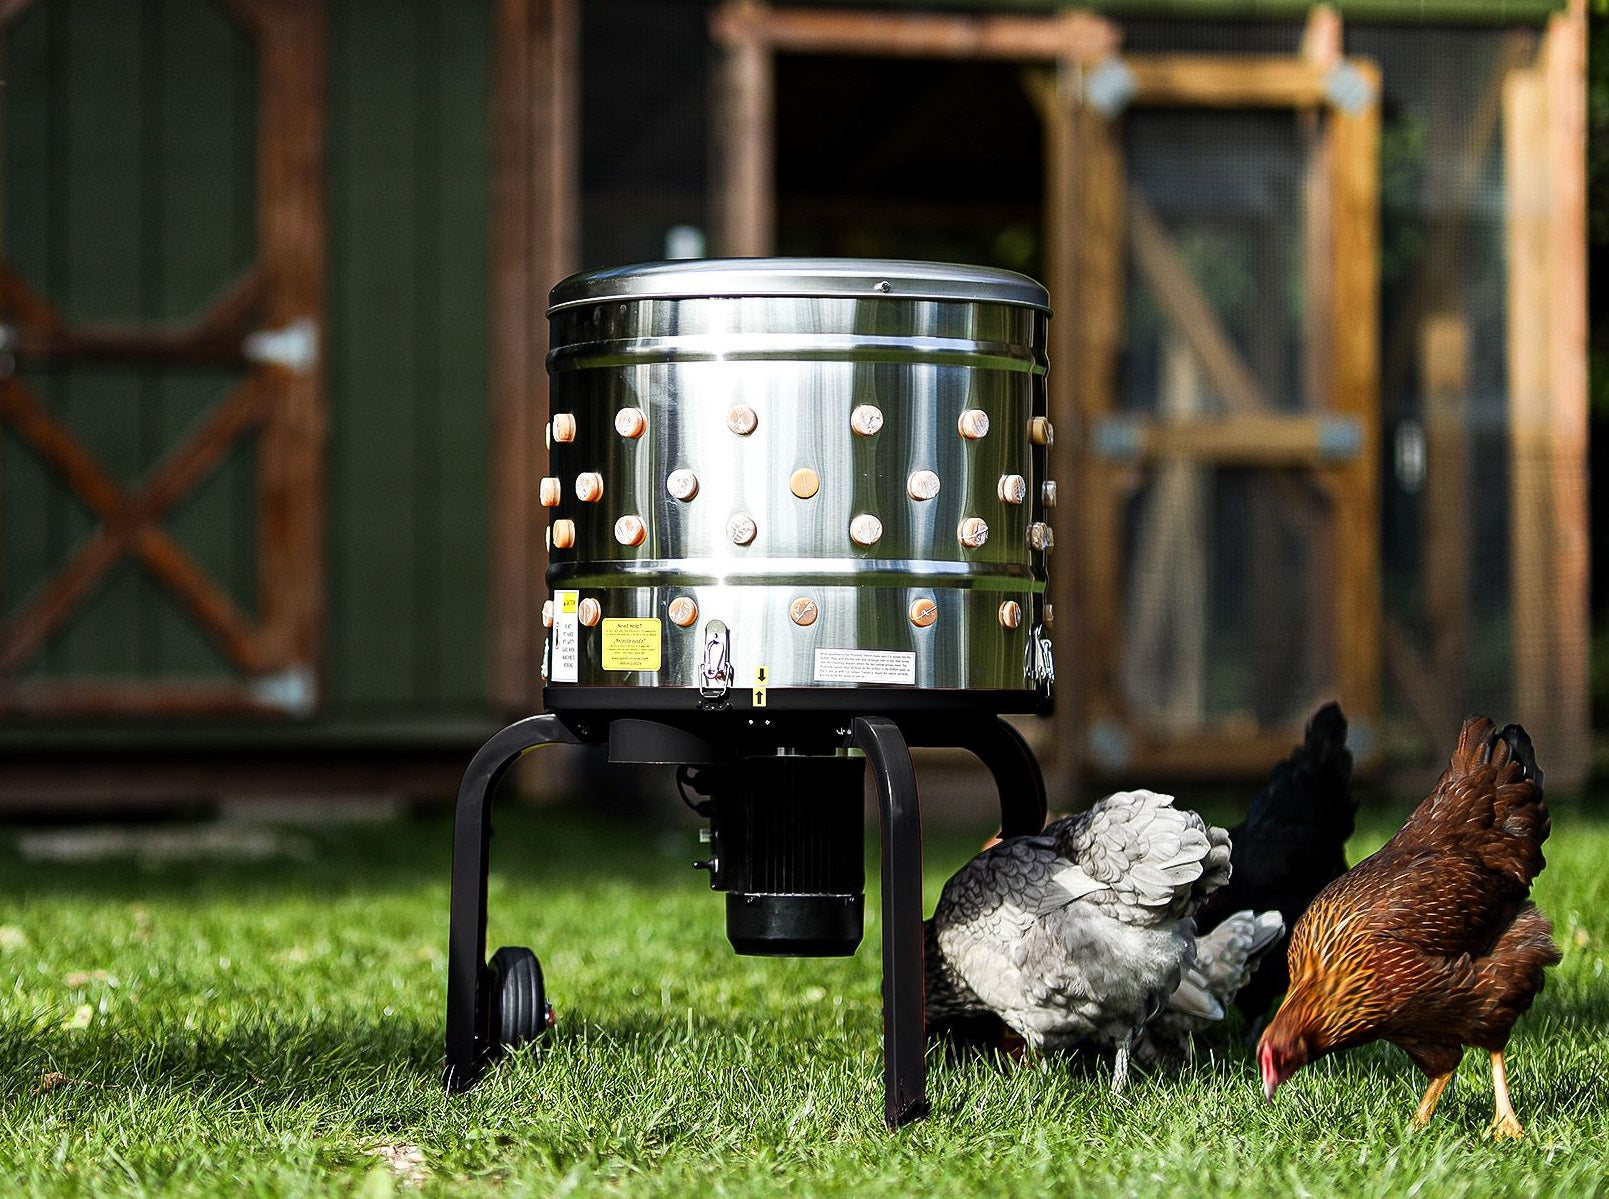
Rubber Fingers
Rubber fingers do most of the work in your chicken plucker. You need to check them after every use as part of your safety checks. Look for cracks, splits, tears, or missing pieces. Damaged fingers can leave feathers behind or even scratch the chicken. If you see any of these problems, replace the finger right away. This keeps your machine working well and protects the chicken.
Here is a simple checklist for rubber finger inspection:
-
Look for cracks, splits, or tears.
-
Check for missing or loose fingers.
-
Feel the rubber for softness and flexibility.
-
Replace any finger that feels hard, brittle, or damaged.
-
Make sure the metal disks holding the fingers have no sharp edges.
Regular cleaning helps you spot these issues quickly. If you notice plucking takes longer or leaves more feathers, check the fingers first. Worn fingers slow down the process and make cleaning harder.
Keep a mix of soft, semi-hard, and hard fingers on hand. This mix helps you get the best results and keeps plucking gentle but effective. If you adjust the machine speed and still see problems, check the fingers again.
Bolts and Belts
Bolts and belts hold your chicken plucker together and keep it running smoothly. You should include them in your weekly safety checks. Loose bolts can cause the machine to shake or break. Worn belts can slip or snap, stopping the machine.
Follow these steps for bolts and belts:
-
Check all bolts and screws for tightness every week.
-
Tighten any loose bolts right away.
-
Inspect belts for cracks, fraying, or signs of slipping.
-
Replace any belt that looks worn or does not move smoothly.
Safety checks on bolts and belts prevent sudden breakdowns. Cleaning the machine gives you a chance to spot these problems early. If you hear strange noises or see the machine move oddly, stop and check the bolts and belts.
Yearly deep cleaning and inspection help you find hidden issues. Take the machine apart once a year to check every part closely. This step keeps your chicken plucker safe and reliable.
By making these inspections part of your regular maintenance, you protect your investment and keep your machine working its best. Safety checks, cleaning, and quick repairs save you time and money in the long run.
Lubrication Tips

Moving Parts
You want your electric chicken plucker to run smoothly every time you use it. Lubricating the moving parts helps you reach this goal. The main parts that need oil include the motor bearings, gears, and drive belts. These parts work hard during each plucking session. If you keep them well-oiled, you reduce friction and stop early wear.
Start by unplugging your machine. Look for the spots where metal rubs against metal. These areas need a thin layer of food-safe machine oil or a light-duty grease. Avoid using heavy oils or sprays that attract dust. You can use a small brush or a dropper to apply the lubricant. Wipe away any extra oil with a clean cloth.
Tip: Always use lubricants that are safe for food equipment. This keeps your chicken plucker safe for every use.
Here is a quick table to help you remember which parts to check:
|
Part |
Lubricant Type |
How to Apply |
|---|---|---|
|
Motor Bearings |
Food-safe machine oil |
Dropper/Brush |
|
Gears |
Light-duty grease |
Small brush |
|
Drive Belts |
Silicone spray (light) |
Light mist |
How Often
You should set a regular schedule for lubricating your chicken plucker. Industry standards suggest the following routine:
-
Clean and inspect your machine daily. This helps you spot problems early.
-
Lubricate moving parts like belts and gears every week. This step reduces wear and keeps your machine running well.
-
Perform a detailed inspection and add extra oil or grease each month. Replace any parts that look worn.
-
Schedule a full maintenance check once or twice a year. You may want a professional to help with this.
Keeping a simple log of your maintenance helps you remember when to oil each part. A well-lubricated machine works better and lasts longer.
By following these steps, you protect your investment and enjoy smooth, trouble-free plucking every season.
Storage Care
Dry Location
You need to store your electric chicken plucker in a dry, covered place. Moisture is the main reason metal machines develop rust. If you leave your plucker in a damp or humid area, rust can form on the metal parts. This damage can shorten the life of your machine and make it unsafe to use. Always choose a storage spot with stable temperatures and low humidity. A garage, shed, or utility room works well if it stays dry.
Tip: After each use, clean your machine, wipe all surfaces, and dry it completely. This step is important for care and helps prevent rust from starting.
You can use a protective cover to keep dust and moisture away. A simple sheet works, but a weather-resistant cover gives better protection. Make sure the cover is breathable so moisture does not get trapped inside. If your plucker has wheels or handles, use them to move it without scraping the metal.
Prevent Rust
Rust is the biggest threat to your chicken plucker’s metal parts. You can stop rust by following a few easy steps:
-
Store it in a dry place, away from wet or humid air.
-
Oil moving parts before storage to create a barrier against moisture.
-
Inspect the machine before storing it. Check for loose bolts, worn rubber fingers, and odd motor sounds.
-
Cover the machine to keep out dust and water.
|
Step |
Purpose |
|---|---|
|
Clean and dry |
Remove moisture and dirt |
|
Oil moving parts |
Block rust formation |
|
Use a cover |
Shield from dust/moisture |
If you use these care habits, you lower the risk of rust and keep your machine in top shape. Preventing rust is easier than fixing it later. Regular care protects your investment and keeps your chicken plucker ready for the next job.
Remember, rust forms quickly if you skip drying or store your machine in a damp place. Make storage care part of your routine to avoid problems.
Proper Use

Avoid Overloading
You want your chicken plucker machine to work well and last for many years. One of the most important habits is to avoid overloading the drum. Always follow the manufacturer’s guidelines for the number of birds you process at one time. For most machines, including the Kitchener model, you should only pluck one or two chickens per cycle. If you process turkeys, use just one bird at a time.
-
Overloading slows down the drum and makes effective feather removal harder.
-
Too many birds can cause the machine to wear out faster or even break.
-
You protect the rubber fingers and other parts by following the recommended load.
Tip: Check the drum before each use. If it looks crowded, remove a bird and run a second cycle. This habit keeps your chicken plucker machine efficient and safe.
Many users make the mistake of adding too many birds at once. This can lead to slow feather removal, damage to the drum, and extra strain on the motor. You can avoid these problems by sticking to the right number of birds.
Water Use
Water plays a key role in proper setup and operation. You should always run water over the birds during plucking. This step helps loosen feathers and keeps the drum clean. Wet feathers come off more easily, which means less work for the machine.
-
Use a gentle stream of water while the drum spins.
-
Water helps prevent feathers from sticking to the rubber fingers.
-
Keeping the birds wet reduces wear on the machine and improves cleaning.
Safety Note: Always wear safety gear, such as gloves and eye protection, when using your chicken plucker machine. Water can make surfaces slippery, so keep your workspace clear and dry.
Proper water use not only helps with effective feather removal but also keeps your machine in good condition. You get better results and extend the life of your equipment by following these simple steps. Remember to check your safety gear before each use and make sure you have a proper setup for water drainage.
Follow the Manual
Instructions
You should always follow the Kitchener user manual when caring for your electric chicken plucker. The manual gives you clear steps to keep your machine safe and working well. Many people skip important tasks, like checking for loose parts or using food-safe cleaners. These steps matter for both safety and performance.
Here are the main steps you will find in the manual:
-
Unplug the machine before you start any maintenance.
-
Clean the drum and rubber fingers right after each use. Remove all feathers and dirt, then rinse with water.
-
Inspect the drum and rubber fingers for cracks, dents, or tears. Replace damaged parts as soon as you find them.
-
Check all bolts and screws. Tighten or replace any that are loose or missing.
-
Lubricate moving parts as recommended to keep everything running smoothly.
-
Store the plucker in a dry, safe place. Cover it to protect from dust and animals.
-
Buy replacement parts from the manufacturer to make sure they fit and work well.
Tip: Following these steps helps your machine last longer and keeps it safe for every use.
Track Maintenance
Keeping a maintenance log helps you remember what you have done and when. This habit makes it easy to spot problems early. You can write down each cleaning, inspection, and repair. A simple notebook or a chart works well.
|
Date |
Task Completed |
Notes |
|---|---|---|
|
2024-06-01 |
Cleaned and inspected |
All parts in good shape |
|
2024-06-08 |
Lubricated bearings |
No issues found |
A log helps you see patterns, like which parts wear out fastest. You can plan ahead and avoid sudden breakdowns. Regular cleaning and inspection, tracked in your log, keep your machine reliable and efficient. You will also remember to store your plucker in a dry place, which stops rust and damage.
Skipping these steps can lead to missed problems and costly repairs. Make tracking part of your routine for the best results.
You can keep your electric chicken plucker in top shape with a few simple care habits. Follow these tips:
-
Clean your machine right after each use to remove feathers and dirt.
-
Inspect the drum, rubber fingers, and bolts often for damage or wear.
-
Store your plucker in a dry, safe place to prevent rust.
These care tips help your machine last longer and work better. Make these steps part of your routine. Start using these tips today for the best results.
FAQ
How often should you clean your electric chicken plucker?
You should clean your chicken plucker after every use. This habit keeps your machine safe and helps it last longer. Regular cleaning also prevents bacteria and dirt from building up.
What should you do if a rubber finger breaks?
Replace the broken finger right away. You can find replacement fingers from the manufacturer. Check all fingers for damage during each cleaning. This step keeps your machine working well.
Can you use any oil for lubrication?
No, you should use food-safe machine oil or light-duty grease. These products protect your machine and keep it safe for food use. Avoid heavy oils or sprays that attract dust.
Why does your chicken plucker leave feathers behind?
Worn or damaged rubber fingers often cause this problem. Check the fingers for cracks or splits. Replace any that look worn. Overloading the drum can also make feather removal harder.
How do you prevent rust on your chicken plucker?
Always dry your machine after cleaning. Store it in a dry, covered place. Use a breathable cover to keep out moisture. Oil moving parts before storage to block rust.
Leave a comment