Best Practices for Gas Wood Chipper Maintenance
You want your gas wood chipper to last for years, right? Taking care of it with regular care makes all the difference. When you follow the right tips, you stop problems before they start. Many users see their wood chipper running strong after twenty years just by sticking to simple maintenance. Here’s what happens when you keep up with wood chipper maintenance:
-
Sharp blades and good clearance mean smoother cuts and less wasted fuel.
-
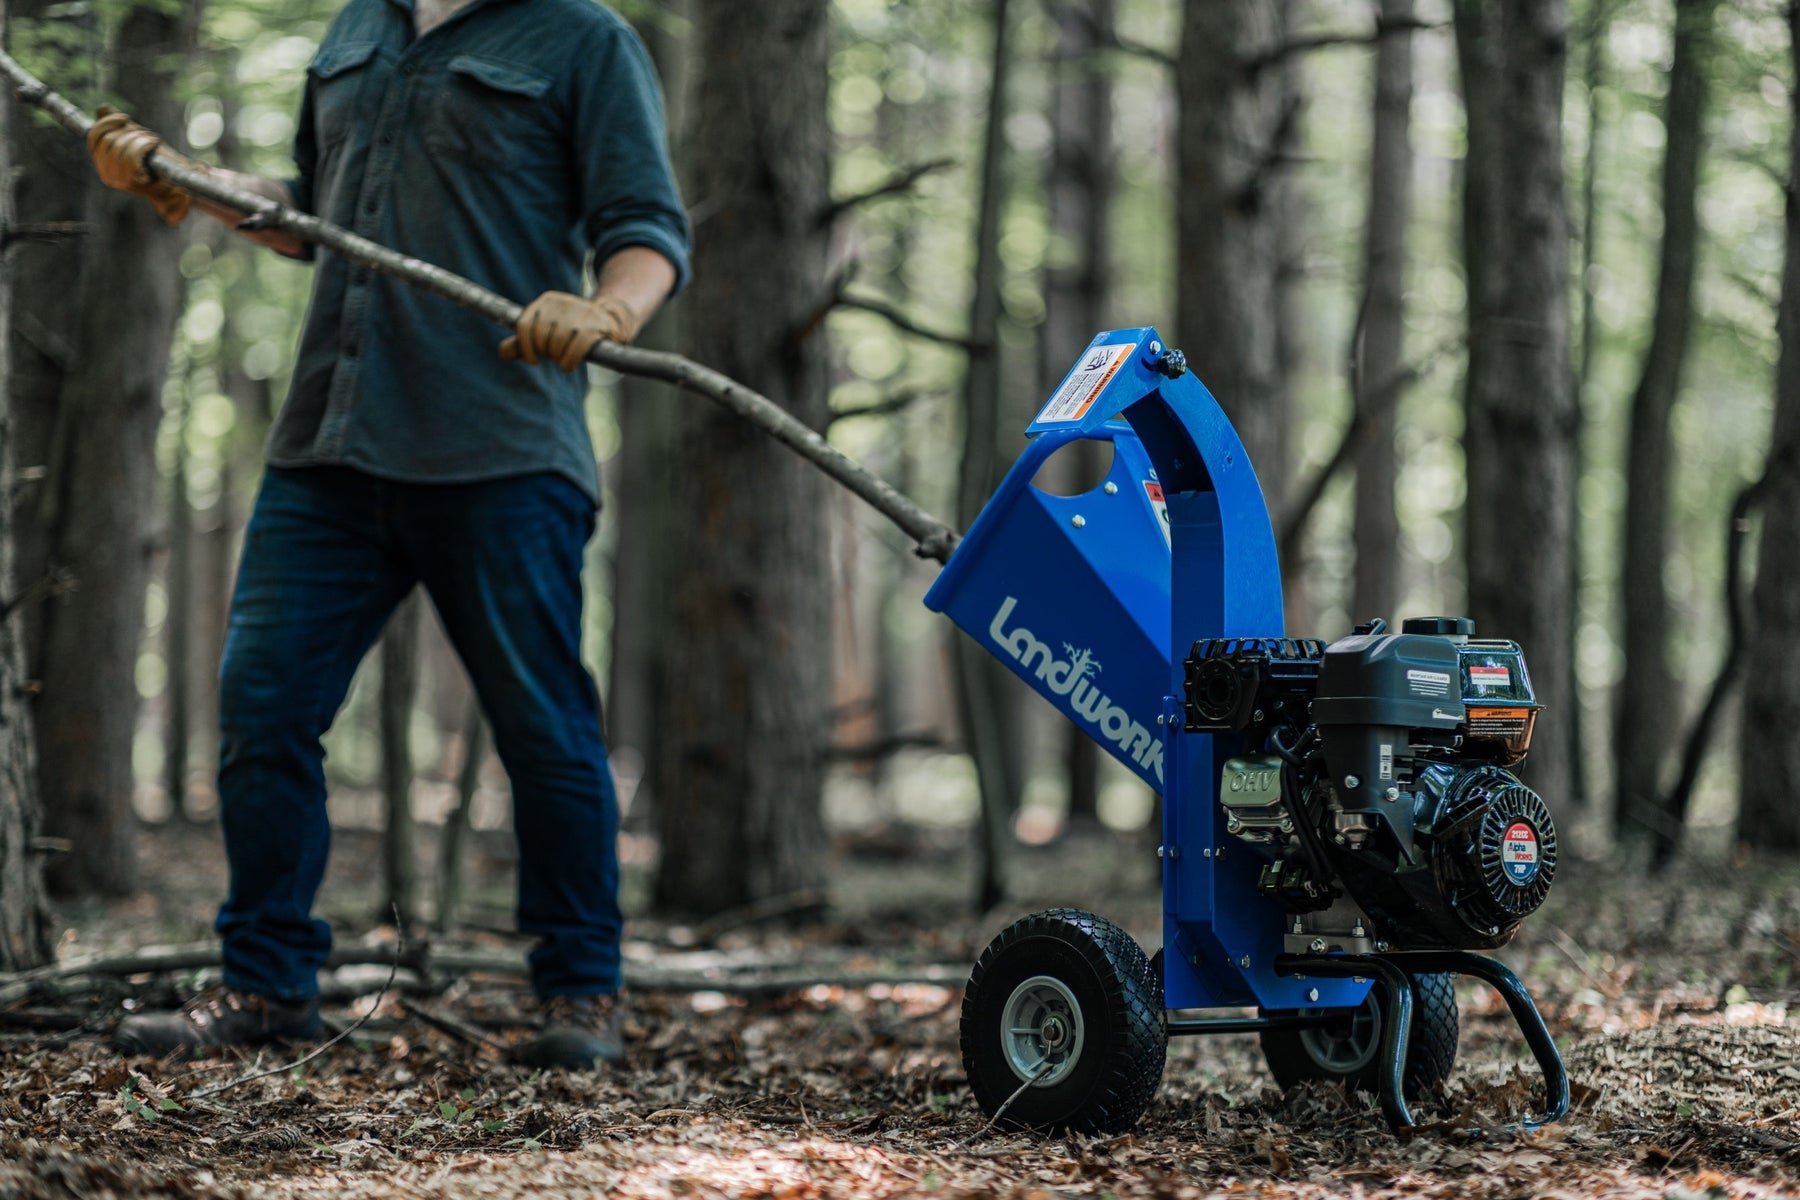
Protecting parts with wearplates helps your Landworks 3-in-1 Wood Chipper or SuperHandy Wood Chipper Mini work better and longer.
-
Good tips for maintaining your wood chipper also mean fewer breakdowns and more time chipping.
Key Takeaways
-
Always turn off your wood chipper before fixing it. Let it cool down first to stay safe and not get hurt. Clean your chipper after you use it. Take out any debris and wipe the metal parts. This helps stop clogs and rust. Keep the blades sharp and lined up. This makes cutting easy, saves fuel, and stops jams. Check and change the engine oil often. Look at the spark plugs and clean the air filters. This keeps the engine working well. Put oil on moving parts and store your chipper the right way. This helps it last longer and saves money on repairs.
Safety Tips
Power Down and Cool Off
Before you do anything with your gas wood chipper, always turn it off and let it cool down. Never rush this step. Hot engines and moving parts can cause burns or serious injuries. Remove the ignition key and wait until everything stops moving. This simple habit keeps you safe and helps prevent accidents. If you need to check the blades or do any cleaning, make sure the machine is completely powered down. Many injuries happen when people try to fix or clean the chipper while it is still running or hot.
Tip: Always use lockout/tagout procedures if your chipper has them. This makes sure the machine stays off while you work.
Wear Protective Gear
You need to wear the right gear every time you use or maintain your wood chipper. Most injuries happen to hands, eyes, and legs. Wear close-fitting gloves, long pants, and heavy-duty boots. Safety glasses or a face shield protect your eyes from flying debris. Ear protection helps with the loud noise. A hard hat is a smart choice, especially if you work around trees. Avoid loose clothing or gloves that can get caught in the machine. These tips help you stay safe and avoid painful accidents.
-
Must-have gear:
-
Safety glasses or face shield
-
Earplugs or earmuffs
-
Close-fitting gloves
-
Long pants and steel-toe boots
-
Hard hat (optional but recommended)
-
Inspect Guards
Before you start, do a quick inspection of all safety guards and shields. Make sure they are in place and not damaged. Guards protect you from moving parts and flying debris. Never remove or bypass them. If you see a loose or broken guard, fix it before using the chipper. This step only takes a minute but can save you from serious harm. Regular inspection of guards should be part of your routine maintenance checklist.
Note: Always feed brush from the side, not directly behind the chipper. This reduces the risk of being hit by branches or debris.
Routine Cleaning
Clean After Each Use
You want your wood chipper to work well every time. The best way to do that is to clean your wood chipper after every use. Most manufacturers say you should always remove debris from the feeding chute and discharge area. This step keeps clogs away and helps your machine run smoothly. If you skip this, you might see your chipper slow down or even stop working.
Tip: Wipe down metal parts after each job. This simple habit helps prevent rust and keeps your machine clean.
Here’s a quick cleaning routine you can follow:
-
Turn off the chipper and let it cool.
-
Use a brush or stick to clear out the chute and discharge area.
-
Wipe down the outside with a dry cloth.
Remove Debris and Build-Up
Debris and wood chips can build up fast. If you let them sit, they can cause rust or damage. Make routine cleaning and inspection part of your regular care. Check for stuck branches, leaves, or sap. These things can block moving parts and make your wood chipper less efficient.
-
Use a small brush or compressed air to get into tight spots.
-
Look for dirt or sap around the blades and moving parts.
-
Remove anything you find right away.
Keeping up with cleaning and inspection helps you avoid costly repairs and keeps your chipper ready for work.
Clean Around Oil and Gas Caps
Dirt near oil and gas caps can sneak into the engine. Always clean around these areas before you refuel or add oil. A clean cap area means fewer engine problems and a longer life for your wood chipper.
-
Wipe the area with a clean rag before opening the caps.
-
Check for leaks or spills as you go.
If you keep your machine clean and follow this routine, you will see better performance and fewer breakdowns. Regular cleaning and inspection are key parts of routine maintenance for any wood chipper.
Blade Maintenance

Check Blade Sharpness
You want your wood chipper to work its best every time. The secret? Keep your blades sharp. Dull blades slow down your work, make the engine strain, and can even cause jams. Before you start chipping, take a few minutes to check the blade and knife care. Look for chips, cracks, or heavy wear. If you see any damage, do not use the machine until you fix it.
Here’s a quick table to help you remember how often to check and sharpen the blades:
|
Aspect |
Recommendation / Details |
|---|---|
|
Sharpening Frequency |
After every 25-50 hours of usage, depending on conditions and blade wear. |
|
Inspection Frequency |
Daily inspections before use to check for dullness, chips, cracks, and proper torque. |
|
Factors Affecting Sharpness |
- Type of wood (softer woods dull blades faster) |
|
Maintenance Tips |
Clean blades and surrounding area after each use to prolong blade life. |
Tip: If you notice the machine working slower, using more fuel, or making uneven chips, it’s time to sharpen the blades.
Sharpen or Replace Blades
You will notice when it’s time to sharpen the blades. The wood chips may look thick or stringy. The engine might get louder or start to vibrate. Sometimes, the chipper stops feeding wood by itself. These are all signs that sharpening blades is overdue.
-
Signs you need to sharpen or replace blades:
-
Uses more fuel than normal
-
Wood chips look uneven or poorly cut
-
Engine vibrates or feels strained
-
Visible blade damage such as cracks, chips, or heavy wear
If sharpening does not fix the problem, you should replace the blades with ones approved by the manufacturer. This helps prevent clogs and keeps your chipper safe.
When you sharpen the blades, follow these steps for the best results:
-
Open the feed chute and remove the inspection plate.
-
Unscrew the bolts and take out the blades.
-
Check the condition of each blade. Flip reversible blades if possible.
-
Use a disc sander, angle grinder, or wet grinder for blade sharpening. Keep the sharpening angle between 20 and 45 degrees.
-
Dip the blades in water while sharpening to keep them cool.
-
Remove any burrs with fine sandpaper.
-
Balance the blades before putting them back.
-
Replace blades if sharpening does not restore performance or if you see cracks.
Note: Sharpening blades every 50 hours is a good rule, but check more often if you chip old or dirty wood.
Adjust Blade Alignment
Blade alignment matters more than you might think. If the blades are not lined up right, you get uneven cuts, more engine vibration, and even safety risks. Loose screws or worn parts can make the blades shift out of place. Always check the alignment after you sharpen the blades or replace them.
-
Why alignment is important:
-
Sharp blades cut better and use less fuel.
-
Proper alignment prevents jams and reduces engine strain.
-
Good alignment keeps the machine safe and smooth.
-
To adjust blade alignment, tighten all screws and bolts. Make sure the blades sit at the correct angle. If you see any wobble or hear odd noises, stop and check the alignment again. Secure all safety guards before you start the engine.
Keeping up with blade and knife care helps your chipper last longer and work better. Regular maintenance and sharpening blades will save you time and money.
Engine Maintenance
Taking care of your engine is the heart of good wood chipper maintenance. If you want your machine to last, you need to pay attention to regular oil checks, spark plugs, and air filters. Let’s break down each step so you can keep your chipper running strong.
Check and Change Oil
Oil keeps your engine running smoothly. If you skip regular oil checks, your engine can overheat or wear out fast. You should always check the oil before you start the wood chipper. Look for clean oil at the right level. Dirty or low oil means it’s time for a change.
Here’s a simple table to help you remember when to change the oil:
|
Maintenance Interval |
Oil Change Recommendation |
|---|---|
|
Change engine oil |
|
|
Change engine oil |
You should change the oil after the first 8 hours of use. After that, change it every 50 hours. This schedule keeps your engine in top condition.
When you pick oil, think about the weather and how you use your chipper. Here are some tips:
-
Choose SAE 5W-30 for cold days.
-
Synthetic SAE 5W-30 works well in all temperatures and helps with cold starts.
-
SAE 10W-30 is a good choice for most climates.
-
For heavy use, try Vanguard 15W-50.
-
Always use high-quality detergent oils with an API service classification of SJ or higher.
Some users like to flush out old oil before adding new oil. This helps keep the engine clean. Multi-weight oils like 10W-30 or 10W-40 work well if the temperature changes a lot where you live.
Tip: Always do regular oil checks before each use. Clean oil means a healthy engine and fewer repairs.
Inspect Spark Plugs
Spark plugs help your engine start and run. If they get dirty or worn out, your chipper might not start or could run rough. You should inspect the spark plug after every 10 to 20 hours of use. If you see damage or heavy buildup, replace it right away.
Here’s a quick checklist for spark plug care:
-
Turn off the engine and let it cool.
-
Disconnect the spark plug wire.
-
Remove the spark plug and look for dirt, cracks, or wear.
-
Clean the spark plug with a wire brush if it looks okay.
-
Replace the spark plug if you see damage or if cleaning does not help.
-
Put the spark plug back in and reconnect the wire.
If you use your chipper in dusty or dirty places, check the spark plug more often. This simple step helps prevent big repairs and keeps your engine running well.
Note: Always follow safety steps. Shut down the engine, wait for moving parts to stop, and disconnect power before you work on the spark plug.
Air Filter Care
Your air filter keeps dirt and dust out of the engine. A clean air filter means better performance and longer life for your chipper. If the air filter gets clogged, your engine can lose power or even stop working.
Follow these steps to care for your air filter:
-
Turn off the wood chipper and make sure all moving parts have stopped.
-
Let the engine cool for at least five minutes.
-
Disconnect the spark plug wire before you start.
-
Take out the air filter cover.
-
Replace the paper part of the air filter.
-
Clean the foam filter with soap and water. If it looks damaged, replace it.
-
Check the air filter often and clean or replace it as needed.
-
Always use genuine parts and follow the schedule in your owner’s manual.
You should clean or replace the air filter at the end of each season. If you use your chipper a lot or in dusty areas, check it more often. Removing debris from the engine area also helps keep everything in good condition.
Tip: Good engine and fluid maintenance starts with regular oil checks, spark plug care, and air filter cleaning. These steps keep your engine strong and ready for any job.
Lubrication Tips
Keeping your gas wood chipper running smoothly means you need to pay attention to lubrication. When you grease the right parts, you stop squeaks, reduce wear, and help your machine last longer. Here are some simple tips to keep everything moving as it should.
Grease Moving Parts
You want your wood chipper to work without any strange noises or breakdowns. The best way to do this is to lubricate moving parts like gears, rollers, and bearings. Greasing these parts reduces friction and helps prevent damage. Always check your user manual for the right type of grease. Some machines need light machine oil, while others work best with heavy-duty grease.
-
Lubricate all grease fittings at the end of each season.
-
Pay special attention to the PTO shaft, flywheel bearings, and PTO sheave bearings.
-
Greasing bearings and moving parts extends the life of your chipper.
If you hear squeaking or grinding, that’s your chipper telling you it needs grease.
Here’s a quick list of parts you should grease:
-
Gears and rollers
-
Flywheel bearings
-
PTO shaft grease fittings
-
PTO sheave bearings
Lubricate Feed Mechanisms
Feed mechanisms work hard every time you use your chipper. If you keep them clean and well-lubricated, you avoid jams and keep the machine running smoothly. Regular greasing of these parts is a smart habit. You don’t need to wait for a problem—make it part of your routine maintenance.
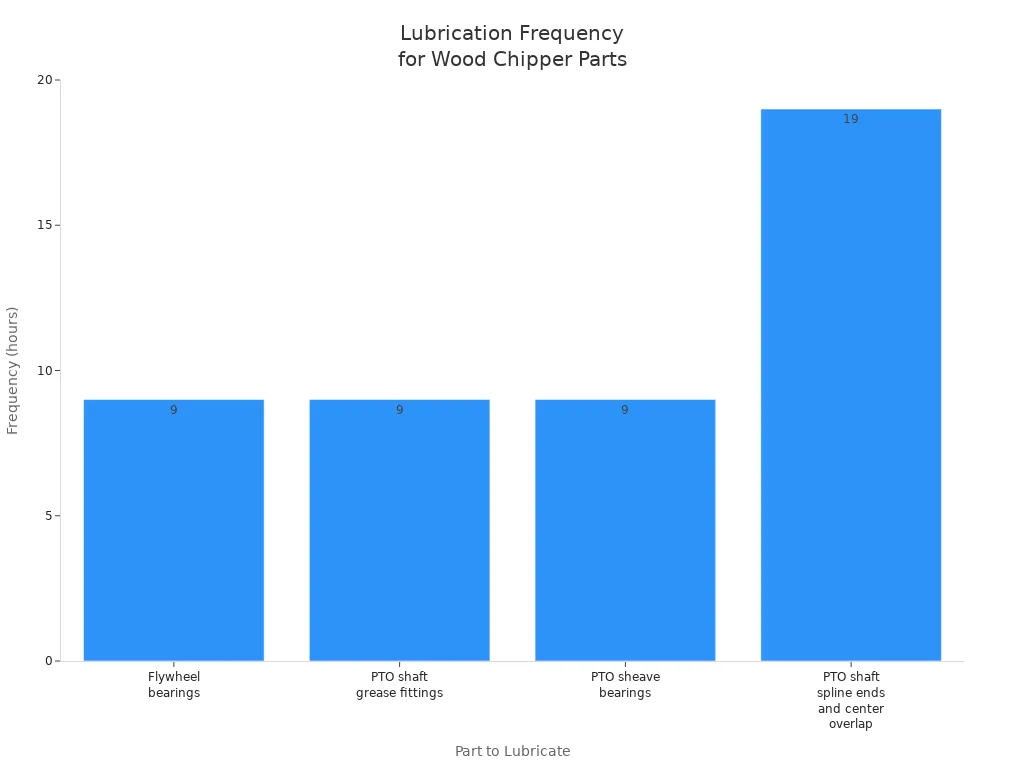
Check out this table for how often to lubricate key parts:
|
Part to Lubricate |
Lubrication Frequency (hours of operation) |
|---|---|
|
Flywheel bearings |
Every 8-10 hours |
|
PTO shaft grease fittings |
Every 8-10 hours |
|
PTO sheave bearings |
Every 8-10 hours |
|
PTO shaft spline ends and center overlap |
Every 18-20 hours |
Note: Lubricate more often if you use your chipper in dusty or dirty places.
If you follow these tips, you’ll notice smoother operation and fewer breakdowns. Your chipper will thank you with years of reliable service.
Fasteners and Belts
Check and Tighten Fasteners
Loose fasteners can cause big problems for your wood chipper. You want every part to stay secure while you work. If you skip this step, you might hear rattling or see parts shift out of place. That can lead to damage or even accidents. So, make it a habit to check all the important fasteners before each use.
Here are the most common fasteners you should inspect:
-
Knife and wear plate attachment screws
-
Flywheel bearing collar set screws
-
General hardware like nuts, bolts, and welds
You can use a wrench or socket set to check if everything feels tight. If you find a loose screw or bolt, tighten it right away. Replace any fastener that looks worn or damaged. This simple routine keeps your chipper safe and running smoothly.
Tip: Give your chipper a quick shake before starting. If you hear anything loose, stop and check the fasteners.
Adjust Belt Tension
Drive belts help your chipper work hard. If a belt gets loose or worn, you might notice the flywheel stops spinning or the chipping slows down. You can avoid these problems by checking the belt tension often.
Before you start, always turn off the engine, remove the key, and wait for all moving parts to stop. Safety comes first! Next, look at the drive belt for signs of stretching, fraying, or damage. If you see any of these, it’s time to tighten or replace the belt.
Here’s a quick checklist for belt care:
-
Check belt tension after the first hour of use, then regularly.
-
Remove debris from the hopper inlet and discharge chute before working on the belt.
-
Inspect the drive pulley alignment and adjust if needed.
-
Replace the belt if it looks stretched or damaged.
Note: Always read your Owner’s Manual for detailed steps and safety tips. Following the maintenance schedule helps your chipper last longer and work better.
Fuel System Care
Taking care of your fuel system keeps your wood chipper running strong. Bad fuel can cause starting problems, rough running, or even damage. You can avoid these headaches with a few simple steps.
fresh fuel before your next job.
Add Fuel Stabilizer
Use Fresh Gasoline
Always use fresh gasoline in your chipper. Old gas breaks down and can clog the
You want your fuel to last longer, especially if you do not use your chipper every week. Fuel stabilizers help keep gasoline fresh and protect your engine. Here’s how they work:
-
Ethanol-blended fuels can pick up water, which leads to fuel breakdown.
-
Stabilizers with alcohol, like isopropanol, absorb water and keep it mixed in the fuel.
-
Some stabilizers push air out of the gas can, stopping moisture from getting in.
-
These products slow down oxidation, so your gas stays good for months.
-
Many people who use outdoor equipment add stabilizer before storing their machines.
Just pour the right amount of stabilizer into your gas can before filling up. This small step makes a big difference in your maintenance routine.
Clean Fuel Tank and Lines
A clean fuel system means fewer problems. Dirt, water, or old gas can block the fuel lines and stop your chipper from working. You should check the tank and lines every season. If you see dirt or rust, empty the tank and wipe it out. Use a small brush or cloth to clean the inside. For the fuel lines, look for cracks or clogs. Replace any line that looks worn out.
Keeping your fuel system clean helps your chipper start faster and run better. You spend less time fixing problems and more time getting the job done.
Storage and Seasonal Maintenance
Prepare for Storage
Getting your gas wood chipper ready for storage keeps it in top shape for next season. You want to avoid problems when you pull it out again. Here’s a simple checklist to follow:
-
Change the oil so your engine stays smooth and cool.
-
Check the spark plug for dirt or damage. Replace it if needed.
-
Clean or swap out the air filter to help the engine breathe better.
-
Remove all debris from the feeding chute and discharge area. This step helps stop blockages and rust.
-
Add a fuel stabilizer to your gasoline. This keeps the fuel fresh and protects the engine.
-
Run the engine for about 5-10 minutes. This spreads the treated fuel through the system.
-
Wipe down the outside of your chipper to keep it clean.
-
Store your chipper in a dry spot, away from rain and humidity.
-
Disconnect the spark plug cable for safety.
-
Check for rust now and then. Fix any spots you find right away.
Tip: If you plan to store your chipper for more than a month, follow your manual’s long-term storage instructions.
Prevent Rust and Moisture
Rust can sneak up on your machine if you’re not careful. You want to keep your chipper dry and protected. Here are some easy ways to stop rust and moisture:
-
Store your chipper in a dry, sheltered place. A garage or shed works great.
-
In cold weather, keep the chipper indoors. This stops fluids from freezing.
-
Wipe off any water or dampness after each use.
-
Use rust-prevention spray on exposed metal parts.
-
Disconnect the spark plug before storage to prevent accidents.
Keeping your chipper dry is one of the best maintenance habits you can have.
Remove Battery for Winter
If your chipper has a battery, winter can be tough on it. Cold weather drains battery power fast. You should remove the battery before storing your chipper for the season.
-
Take out the battery and store it in a cool, dry place above freezing.
-
Use a trickle charger if you want to keep the battery charged all winter.
-
Removing the battery stops it from losing power and helps it last longer.
A little care now means your chipper will start right up when you need it again.
Troubleshooting Chipper Maintenance
When your wood chipper acts up, you want answers fast. Let’s walk through troubleshooting common issues so you can get back to work.
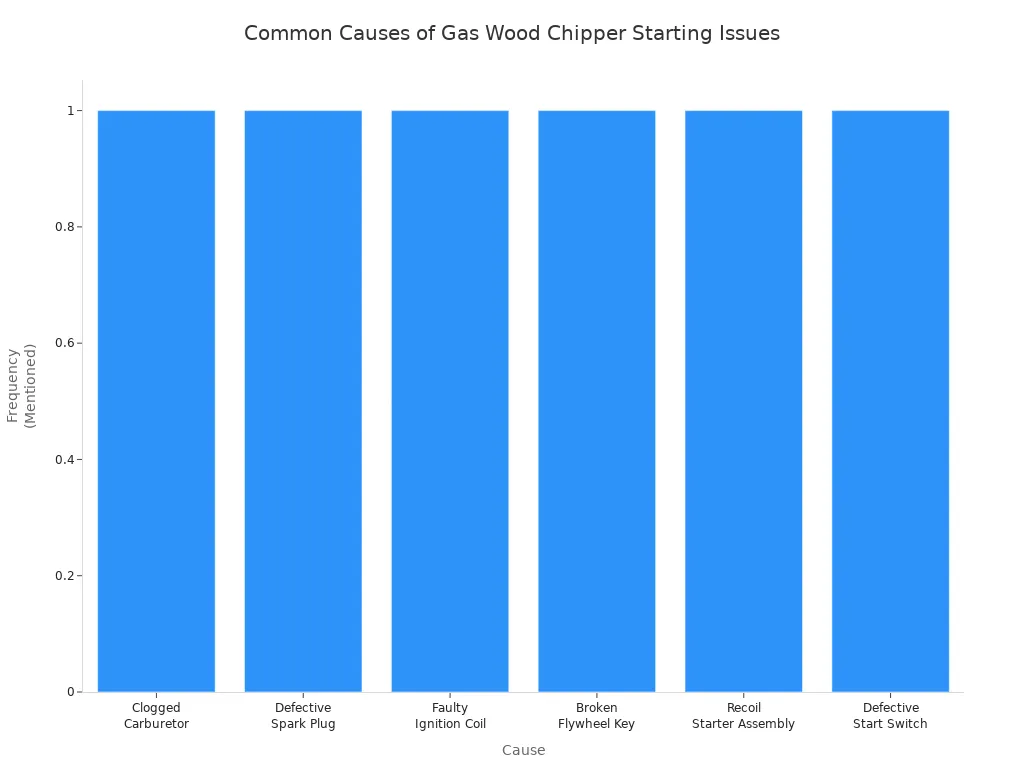
Starting Issues
If your chipper won’t start, don’t panic. Old fuel is a big troublemaker. Leaving gas in the tank over winter can clog the carburetor and stop the engine from firing up. One user found their chipper wouldn’t start after winter storage. Draining the old gas and adding fresh fuel finally solved the problem.
Here’s a quick table to help you spot the cause and fix it:
|
Cause |
What Happens |
What You Can Do |
|---|---|---|
|
Old fuel leaves sticky residue, blocking fuel flow |
Clean or replace carburetor |
|
|
Defective Spark Plug |
No spark, engine won’t start |
Replace spark plug |
|
Faulty Ignition Coil |
No voltage to spark plug |
Test and replace if needed |
|
Broken Flywheel Key |
Engine won’t turn over |
Inspect and replace key |
|
Recoil Starter Issue |
Engine won’t crank |
Check and replace starter assembly |
|
Bad Start Switch |
Won’t turn or works off and on |
Test and replace switch |
Tip: Always use fresh gas and check the spark plug before you try anything else.
Unusual Noises
Strange sounds can mean trouble. Grinding, screeching, or backfiring noises tell you something needs attention. Here’s how you can figure out what’s wrong:
|
Noise Type |
Possible Cause(s) |
What To Do |
|---|---|---|
|
Grinding |
Metal parts hitting or blade issue |
Stop right away, check blades, tighten bolts, inspect bearings, clear debris |
|
Screeching |
Dry or worn bearings |
Lubricate or replace bearings, check for debris, adjust clutch and belt |
|
Backfire |
Timing or flywheel key problem |
Check ignition system, inspect flywheel key, adjust timing |
If you hear a weird noise:
-
Stop the chipper and disconnect the spark plug.
-
Check for dull or damaged blades.
-
Tighten all screws and bolts.
-
Remove any debris from the hopper or chute.
-
Lubricate bearings if they squeak.
Don’t ignore new noises. Fixing them early keeps your chipper safe and running smooth.
Poor Chipping Performance
When your chipper struggles, you can usually fix it with a little maintenance. Dull or broken blades cause jams and uneven chips. Clogged chutes or screens slow everything down. Worn bearings and loose screws also hurt performance. Dirty spark plugs, low oil, or a clogged air filter can make the engine weak.
-
Check and sharpen blades if chips look rough.
-
Clean out the feeding chute and discharge area.
-
Tighten any loose screws.
-
Replace or lubricate worn bearings.
-
Clean or replace the air filter and spark plug.
Regular chipper maintenance stops these problems before they start. If you keep up with these steps, your machine will work better and last longer.
Recommanded Brands
Landwords, G, SuperHandy
When you pick a gas wood chipper, you want to know how to care for it the right way. Each brand has its own tips and schedules. Let’s look at what you should do for Landwords, G, and SuperHandy chippers.
Landwords:
You should check the blades and belts every 25 hours of use. Clean the air filter after every 10 hours. Change the oil after the first 8 hours, then every 50 hours. Landwords recommends you inspect the safety guards before each use. If you see any worn parts, swap them out right away.
G:
G chippers need a little extra attention to the fuel system. Clean the fuel tank and lines at the end of each season. Check the spark plug every 20 hours. Lubricate moving parts every 10 hours. G also suggests you keep the chipper dry to prevent rust.
SuperHandy:
SuperHandy chippers work best when you clean debris after every job. Sharpen or flip the blades every 30 hours. Change the oil every 40 hours. SuperHandy says you should store the chipper indoors during winter.
Always use genuine parts for repairs or replacements. This keeps your chipper safe and running well.
Taking care of your gas wood chipper pays off in big ways. When you stick to a routine, you keep your machine safe, efficient, and ready for any job. Here’s what you get from maintaining your wood chipper:
-
You extend the life of your gas wood chipper and avoid costly repairs.
-
Sharp blades and clean parts mean better cutting and less fuel use.
-
Regular cleaning stops rust and keeps your gas wood chipper running strong.
-
Safe habits protect you and your machine every time.
Check your owner’s manual and use genuine parts for the best results.
FAQ
How often should you sharpen wood chipper blades?
You should check blade sharpness before each use. Most users sharpen blades every 25 to 50 hours. If you notice rough chips or slow chipping, sharpen the blades sooner.
What type of oil works best for gas wood chippers?
Use high-quality SAE 30 oil for warm weather. For cold days, try SAE 5W-30. Synthetic oils work well in all temperatures. Always check your owner’s manual for the best choice.
Can you use regular gasoline in your wood chipper?
Yes, you can use regular unleaded gasoline. Always pick fresh gas. Avoid fuel with more than 10% ethanol. Old or dirty gas can cause starting problems.
What should you do if your chipper won’t start?
First, check the fuel and spark plug. Make sure you have fresh gas and a clean spark plug. If it still won’t start, inspect the air filter and carburetor for clogs.
How do you store your chipper for winter?
-
Clean the machine
-
Change the oil
-
Add fuel stabilizer
-
Remove the battery (if it has one)
-
Store in a dry place
These steps help your chipper start easily next season.
Dejar un comentario