How to Use an Electric Chicken Plucker Safely and Efficiently
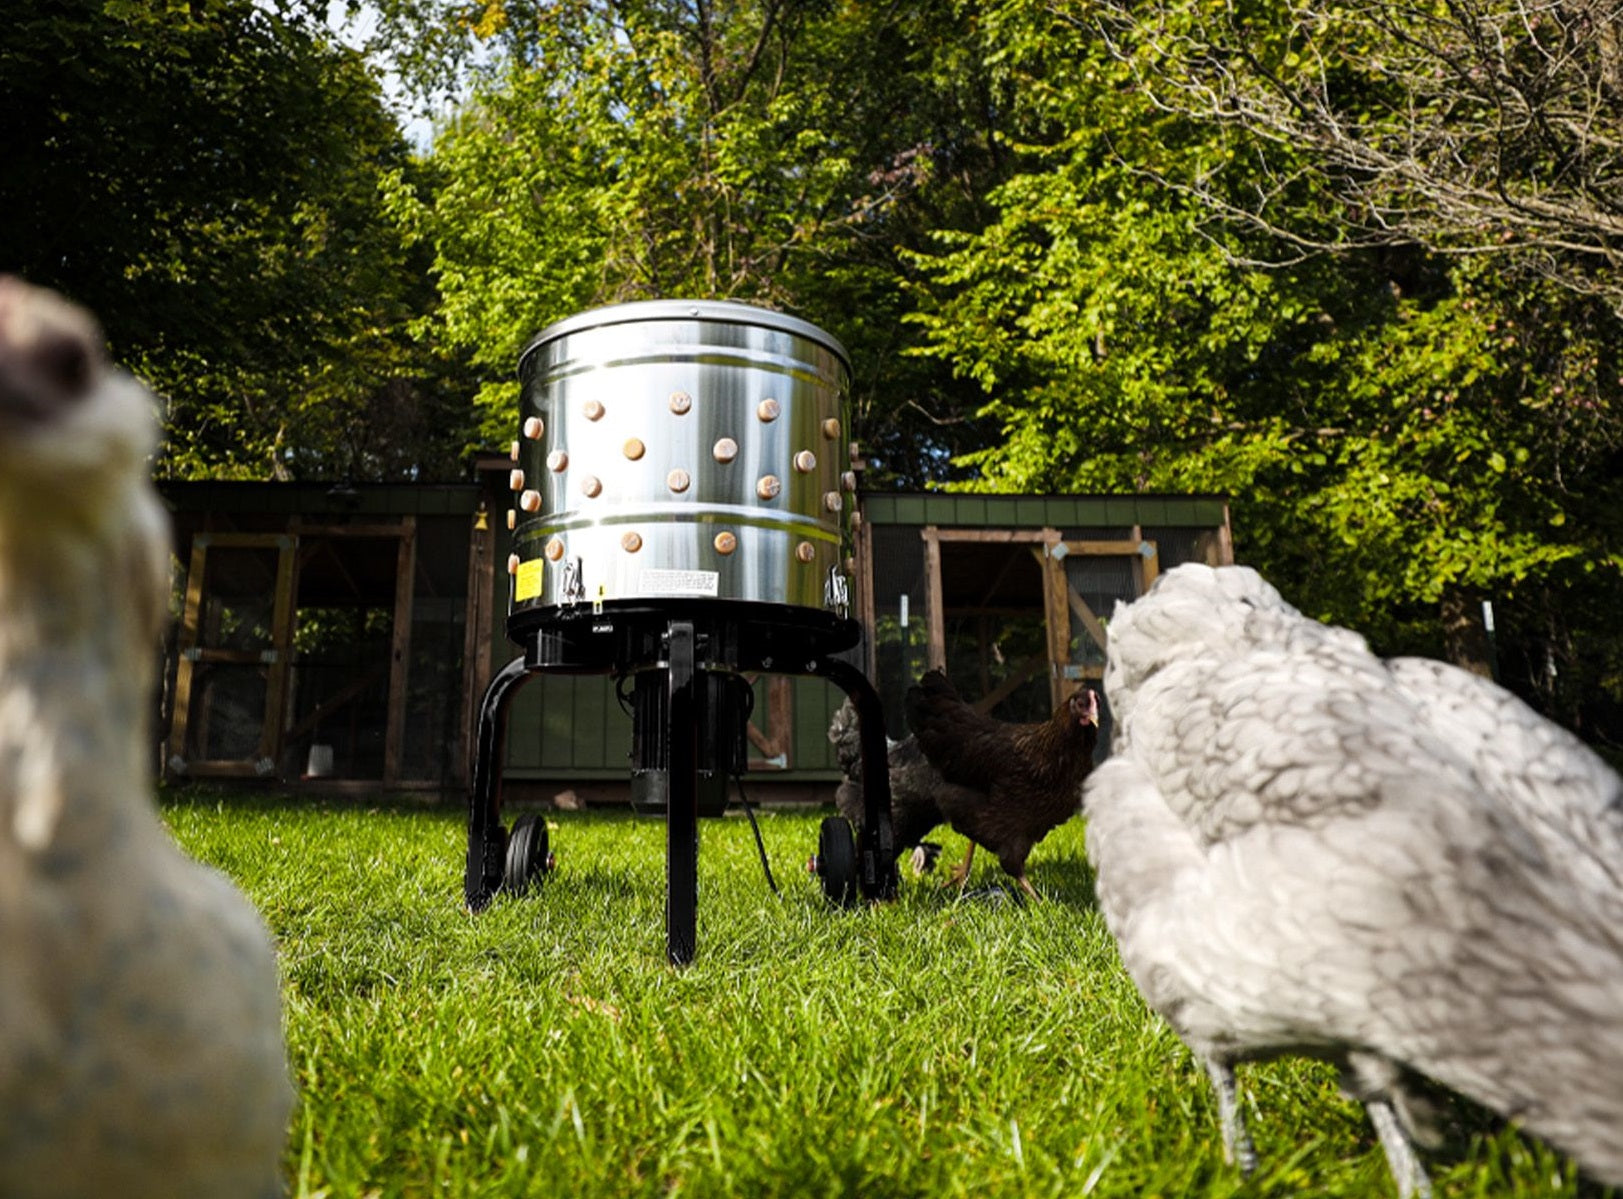
You can use an electric chicken plucker with confidence when you focus on safety and follow each step carefully. Choose the best chicken pluckers that offer durability and build quality for your harvesting needs. Before you start harvesting, check the yardbird chicken plucker for proper setup. Quality Food Processing depends on how well you prepare your yardbird chicken plucker and your chickens. Many people trust the yardbird chicken plucker because it delivers clean results and high quality. A good chicken plucker review often highlights the Kitchener Chicken Plucker for its effective feather removal. Yardbird chicken plucker models help you achieve better results in less time.
Key Takeaways
-
Always wear safety gear like goggles, gloves, and closed-toe shoes when using a chicken plucker to protect yourself from injury.
-
Prepare chickens by scalding them properly to loosen feathers and make plucking faster and easier.
-
Set up your chicken plucker on a stable, clean surface and never overload it to keep the machine working well and avoid damage.
-
Clean your chicken plucker after every use to prevent bacteria buildup and maintain its performance and durability.
-
Regularly check and maintain parts like rubber fingers and bolts to ensure safe, efficient, and long-lasting operation.
Safety with Electric Chicken Plucker
Personal Protective Gear
You should always wear the right protective gear when using a chicken plucker. Safety goggles protect your eyes from flying feathers and debris. Gloves help keep your hands safe from moving parts and sharp edges. Many people trust the yardbird chicken plucker because it works well with safety gear and makes the process easier. You should also wear closed-toe shoes to protect your feet. The Kitchener brand designs its chicken plucking machines with user safety in mind, making it a trusted choice for many.
Safe Setup
Set up your yardbird chicken plucker on a flat, stable surface. This prevents the machine from tipping over during use. Make sure the area is dry to avoid slips and falls. Before you start, check that all parts of the chicken plucker are clean and in good condition. Stainless steel drums are easy to clean and help reduce the risk of bacteria. Some yardbird chicken plucker models have irrigation rings that connect to a water source. This feature helps wash away feathers and keeps the machine clean while you work. Always follow the manufacturer’s instructions for setup and use. Turn off the electric chicken plucker before cleaning or maintenance.
Tip: Regular cleaning after each use keeps your yardbird chicken plucker safe and reduces microbial hazards.
Keep Area Clear
Keep children and pets away from the workspace when using a chicken plucker. Never use live poultry in the machine. Only process birds that have been properly prepared. Remove any clutter from the area to prevent accidents. The yardbird chicken plucker works best in a clean, open space. This helps you move safely and keeps the process efficient. Always follow safety guidelines from the manufacturer to protect yourself and others.
Preparing Chicken and Plucker
Scalding Chickens
Scalding chickens before using a chicken plucker makes feather removal much easier and faster. You should heat water to the right temperature and immerse each bird for the correct amount of time. This step helps loosen feathers, so the chicken plucker can work at its best. If you skip proper scalding, you may spend more time and effort during harvesting.
|
Water Temperature (°C) |
Time (seconds) |
Application |
Feather Retention Force Reduction |
Mean Feather Removal Quality Score (1=best, 3=worst) |
|
|---|---|---|---|---|---|
|
Hard Scalding |
>60 |
45–90 |
Waterfowl |
Not specified |
N/A |
|
Medium Scalding |
54–58 |
60–120 |
Mature birds |
N/A |
N/A |
|
Soft Scalding |
50–53 |
60–180 |
Broilers, roasters, young turkeys |
N/A |
N/A |
|
Immersion Scalding |
50–64 |
Variable |
General |
90% reduction in feather retention force |
N/A |
|
Delay Processing Groups |
N/A |
N/A |
N/A |
N/A |
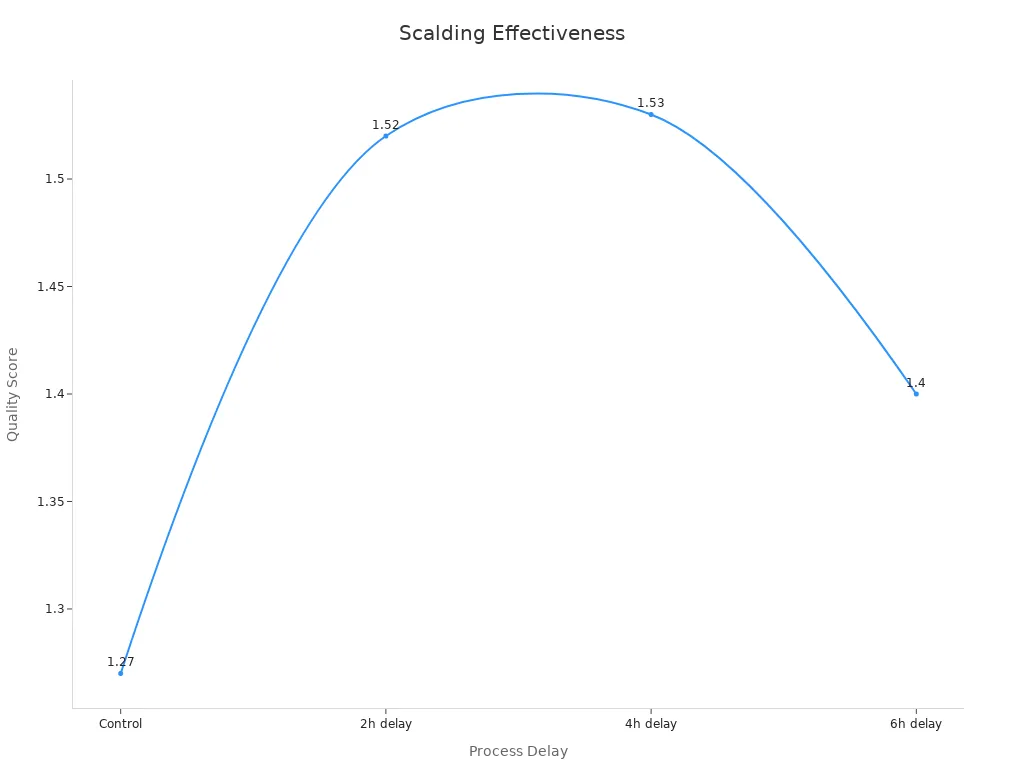
Control: 1.27 (best), 2h delay: 1.52, 4h delay: 1.53, 6h delay: 1.40 |
Proper scalding can reduce feather retention force by up to 90%. This means you can remove feathers in just 15–30 seconds per bird with a chicken plucker, compared to 15–30 minutes by hand. The chart below shows how immediate scalding and processing give you the best results:
Machine Inspection
Before you start harvesting, inspect your chicken plucker carefully. Check the drum and rubber fingers for any dirt or leftover feathers. Clean parts help you avoid contamination and keep your poultry processing safe. Make sure all moving parts work smoothly. If you use chicken plucking machines made from ABS plastic, you get a rust-proof and lightweight tool that is easy to clean and maintain. This choice improves safety and makes your equipment last longer.
-
Proper preparation of both the chicken and the plucker leads to:
-
Cleaner skin and fewer broken feathers
-
Faster feather removal and easier cleanup
-
Lower risk of accidents during harvesting
-
Reliable long-term performance and less maintenance
-
Workspace Organization
Organize your workspace before you begin poultry processing. Set up your chicken plucker on a stable surface with enough room for you to move safely. Keep all tools and supplies within reach. Make sure you have enough capacity for the number of birds you plan to process. Remove any clutter to prevent accidents. When you plan your space, you work faster and safer. Good organization also helps you keep track of your equipment’s capacity and makes harvesting more efficient.
Tip: Always check your chicken plucker’s capacity before starting. Overloading can slow down feather removal and cause damage to your machine.
How to Use a Chicken Plucker

Loading Chickens
You need to load chickens into the plucker with care. Start by making sure each bird is properly scalded. The skin should feel waxy and soft after immersion in water heated between 145°F and 155°F. This step helps the feathers come out easily and protects the machine from strain. When you use an electric chicken plucker, always check the plucking capacity before loading. Most chicken plucker models work best when you process one or two chickens at a time. Overloading the drum can damage the machine and slow down harvesting. For turkeys, only load one bird per cycle.
Tip: Never force more birds into the drum than the recommended capacity. This keeps your yardbird chicken plucker running smoothly and extends its life.
If you use handheld chicken plucking machines, hold the bird firmly and work on one at a time. This method gives you more control and prevents accidents during harvesting.
Operating the Machine
Once you have loaded the chickens, you can start the operation. Turn on the yardbird chicken plucker and make sure the built-in irrigation system is running. Continuous water flow rinses away feathers and keeps the drum clear. This step prevents clogging and helps maintain the plucking capacity.
Follow these steps for safe and efficient operation:
-
Check that the drum and rubber fingers are clean.
-
Place the bird(s) in the drum, keeping within the recommended capacity.
-
Turn on the machine and let it run for 15–30 seconds.
-
Watch as the feathers come off quickly and collect in the drum or chute.
-
Use the irrigation system to wash away loose feathers during the process.
If you use a handheld plucker, move the device in a circular or pentagonal pattern over the bird. This technique improves feather removal and keeps the process efficient. Always follow the instructions provided with your yardbird chicken plucker for best results.
Note: Proper operation of your electric chicken plucker helps you achieve high feather removal rates and reduces the time spent on poultry processing.
Monitoring and Removal
You need to monitor the machine closely during harvesting. Watch for signs of overload, such as slow drum movement or loud noises. If you notice any problems, stop the operation and remove some birds to match the plucking capacity.
The table below shows important monitoring parameters and their impact on feather removal efficiency:
|
Monitoring Parameter |
Details / Values |
Impact on Feather Removal Efficiency and Throughput |
|---|---|---|
|
Pluck Size |
Optimal at 13 mm |
Achieves up to 95.8% efficiency |
|
Base Clearance |
Optimal at 30 mm |
Contributes to maximum throughput of 4.08 kg/min |
|
Plucking Pattern |
Circular or Pentagonal |
Maximizes efficiency with correct pluck size and clearance |
|
Machine Speed |
Tested at 400, 450, 500 rpm |
Highest average efficiency (84.49%) at 400 rpm |
|
Species of Chicken |
Five different species evaluated |
Efficiency varies by species |
When the feathers have been removed, turn off the yardbird chicken plucker before reaching into the drum. Remove the processed birds and check for any missed feathers. If needed, run the bird through the machine again or use a handheld device for touch-ups.
Batch processing can improve your harvesting speed. When you scale up from small batches to larger ones, you can reduce feather removal time and increase enzyme activity for better results. For example, moving from small flasks to a 5-liter fermenter cut feather degradation time in half and increased removal efficiency to over 94%. This shows that larger batch processing with the right plucking capacity can make poultry processing faster and more effective.
Always clean the drum and rubber fingers after each use. This step keeps your chicken plucker in top condition and ready for the next harvesting session.
If you follow these steps on how to use a chicken plucker, you will protect your equipment, speed up harvesting, and get cleaner results every time.
Feather Removal Efficiency Tips
Batch Processing
You can save time and effort by processing chickens in batches. When you use a chicken plucker, try to group birds of similar size and age. This helps the machine work at its best and keeps the process smooth. Batch processing also lets you keep a steady workflow. You can scald several birds, then move them quickly to the chicken plucker. This method boosts your feather removal efficiency and helps you finish the job faster.
Tip: Always check the capacity of your chicken plucker before starting a new batch. Overloading can slow down the machine and leave feathers behind.
Optimal Scalding
Scalding chickens at the right temperature and for the right amount of time makes a big difference. Hard scalding works best at 60–66 °C for 45–90 seconds, while soft scalding uses 54–58 °C for 60–120 seconds. For Red Feather chickens, hard scalding at 60 °C for 60 seconds gives you better feather removal without harming the skin. The age and skin type of the bird matter more than its weight. If you do not scald enough, feathers stay stuck, especially on the wings and tail. Too much heat can damage the skin. Machines with precise temperature control, like the BAADER Turbo Scalder, help you get even results and protect the meat.
|
Scalding Method |
Temperature (°C) |
Time (seconds) |
Best For |
Effectiveness |
|---|---|---|---|---|
|
Hard Scalding |
60–66 |
45–90 |
Older birds, turkeys |
Best feather removal, white skin |
|
Soft Scalding |
54–58 |
60–120 |
Broilers, young birds |
Gentle on skin, keeps yellow color |
|
Hard Scalding |
60 |
60 |
Red Feather chickens |
Best for tough feathers, no skin damage |
Quick Cleaning
You should clean your chicken plucker between batches. Feathers and dirt can build up fast. A machine that is easy to clean will save you time and keep your workspace safe. Rinse the drum and rubber fingers with water after each use. This step stops bacteria from growing and keeps the chicken plucker working well. If you clean as you go, you will not have to spend as much time on deep cleaning later.
Note: Quick cleaning also helps you spot any worn parts or damage before they cause problems.
Troubleshooting
Sometimes, you may notice feathers left on the bird or the chicken plucker slowing down. Check for clogs in the drum or worn rubber fingers. If the machine vibrates or makes loud noises, turn it off and inspect for loose parts. Always follow the user manual for safe fixes. If you see a drop in feather removal efficiency, review your scalding process and make sure you are not overloading the machine. Regular checks and quick action keep your chicken plucker running smoothly.
Chicken Plucker Maintenance

Cleaning After Use
You should always clean your chicken plucker right after each use. Feathers, dirt, and residue can build up quickly. If you leave these behind, they can affect the quality of your next batch. Start by unplugging the machine. Remove any loose feathers from the drum and rubber fingers. Use water to rinse all parts. Many chicken plucker models are easy to clean, so you can finish this step fast. Pay close attention to the rubber fingers because they touch the chicken directly. Clean parts help you keep the quality of your poultry high and protect the durability of your equipment.
Tip: A clean chicken plucker will last longer and work better every time.
Regular Checks
You need to check your chicken plucker often to keep it in top shape. Look for any cracks or wear on the drum and rubber fingers. If you see damage, replace the parts right away. This step keeps the durability and quality of your machine high. Check all bolts and screws to make sure they are tight. Loose parts can cause problems during use. Regular checks help you spot issues early and avoid bigger repairs later. Good maintenance means your chicken plucker will keep its durability for many seasons.
|
Part to Check |
What to Look For |
Action Needed |
|---|---|---|
|
Drum |
Cracks, dents |
Repair or replace |
|
Rubber Fingers |
Wear, tears |
Replace if needed |
|
Bolts/Screws |
Loose or missing |
Tighten or replace |
Safe Storage
Store your chicken plucker in a dry, safe place. Moisture can cause rust and lower the quality of your machine. Choose a spot that protects your equipment from dust and animals. If you store your chicken plucker well, you keep its durability and build quality strong. Cover the machine if possible. This step keeps it clean and ready for the next use. Safe storage is a key part of good maintenance and helps your chicken plucker deliver top quality every time.
Remember: Good storage habits protect the durability of your chicken plucker and save you money in the long run.
You can achieve the best results when you focus on safety and preparation with your yardbird chicken plucker. Always follow each step to protect yourself and your equipment. A chicken plucker review often highlights how the yardbird chicken plucker delivers clean and efficient feather removal. You keep your yardbird chicken plucker working well by cleaning and checking it after every use. Remember, using your yardbird chicken plucker safely and maintaining it helps you enjoy reliable performance for years.
FAQ
How do you keep your chicken plucker safe during use?
You should always unplug the machine before cleaning or adjusting it. Wear safety goggles and gloves. Keep children and pets away from the workspace. Follow the manufacturer’s instructions for every step.
What should you do if feathers remain after plucking?
Check if you scalded the chicken long enough. Inspect the rubber fingers for wear. You can run the bird through the plucker again or use a handheld tool for touch-ups.
How often should you clean your chicken plucker?
You should clean your chicken plucker after every use. Remove feathers and rinse the drum and rubber fingers with water. Quick cleaning prevents bacteria and keeps your machine working well.
What can you do if your chicken plucker slows down?
-
Unplug the machine.
-
Check for clogs or stuck feathers.
-
Inspect the rubber fingers for damage.
-
Tighten any loose bolts.
If problems continue, review the user manual for more solutions.
How long does a chicken plucker last with good care?
A well-maintained chicken plucker can last for many years. Clean it after each use, check for worn parts, and store it in a dry place. Regular care helps your machine stay reliable and efficient.
Dejar un comentario